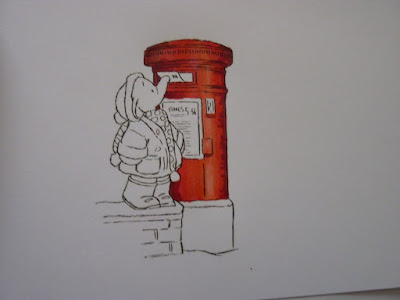
first stamp your image with momento ink onto neenah card
decide where your light sorce will be coming from mine will be on the right hand side
use the lightest of your colours i have used orange no 23.....
then added coral red no 12 at both sides of the orange then with the lightest orange colour 23 work over the coral red to blend the colours at the joins

contiue with other colours in bands as be-for working out to the edges of image...
with scarlet no 13 and brick red no 94 for the darket shadow areas you dont need alot of the brick red

as you can see i have gone over each band of colour with the scarlet then coral red working inwards
till i reached the orange (lightest area)
with chisel end i went over the final strip of orange colour to bring them all together in a smooth blended piece you can add more of the brick red to get deeper shadows but dont forget to blend out with the scarlet
little tip
if you dont have all the colours i have used you can deepen the reds you have by leaving them to dry and going over a smaller area with the same colour
the green grey 3 is very good with the reds that doesnt move the red colour around you can place that on top of your reds once its completed if you choose to
i hope that helps with your reds in Spectrum Noir pens
hugs linda xxx
decide where your light sorce will be coming from mine will be on the right hand side
use the lightest of your colours i have used orange no 23.....
then added coral red no 12 at both sides of the orange then with the lightest orange colour 23 work over the coral red to blend the colours at the joins

contiue with other colours in bands as be-for working out to the edges of image...
with scarlet no 13 and brick red no 94 for the darket shadow areas you dont need alot of the brick red

as you can see i have gone over each band of colour with the scarlet then coral red working inwards
till i reached the orange (lightest area)
with chisel end i went over the final strip of orange colour to bring them all together in a smooth blended piece you can add more of the brick red to get deeper shadows but dont forget to blend out with the scarlet
little tip
if you dont have all the colours i have used you can deepen the reds you have by leaving them to dry and going over a smaller area with the same colour
the green grey 3 is very good with the reds that doesnt move the red colour around you can place that on top of your reds once its completed if you choose to
i hope that helps with your reds in Spectrum Noir pens
hugs linda xxx


6 comments:
Thank you so much for your Spectrum Noir tutorials! I've recently bought some, and your instructions are so very helpful! They are wonderful pens!
luv, Mags x
Thank you, Mary x
Fabulous tutorial Linda!
Sarah xx :0)
Thank you Linda, fabulous tutorial as always. :)
Linda xx
You angel. I missed this tut before. I cannot get my reds right and this is just what I needed to help me.
Thank you!!!
Edna x
Another great tutorial thanks Linda
Pam xx
Post a Comment