Monday, 2 December 2013

Decorating Candles with no need to wrap

Hi there crafters
i have been experimenting 
with candles again
and to be honest with you im blown away!!!
 the magic is 
Stick and Spray 
from 
yes that's right no kidding
i did get good results heating the candles with a wrap
of greased proof paper but holding it in place was a nightmare
it kept slipping which you don't want 
  
so today i got out my candles
stamps embossing powder  and played...
i did 6 candles in just under 12 minutes got quite a little production line going on lol
everyone perfect no runs no pitting or dimples
It's so darn easy 
with the stick and spray
 i have taken some pictures of each step  
in case you might like to try it for your selves

Step 1
heat emboss your stamped image onto tissue paper

Step 2

 cut around your image not to close keeping your edges curved if you can to get a softer effect
Flip over your image over give it a quick light blast of Stick and Spray
 you don't need a lot a fine mist will work brilliantly

there is no rush it will stay tacky for quite a while
just let the spray agent evaporate  like you would if you use if for stamping

Step 3


place your image right side up onto your candle and smooth out with your finger tips
you can re-position at any time as i said no rush 
make sure there are  no bubbles or creases in the tissue paper
and heat set the image
Making sure your heat gun is moving at all times

you will clearly see the wax melting through the tissue 
you move to another area

once it was all done  but still warm
i rolled the candle onto some grease proof paper to make sure all the edges were in cased in wax
but really i didn't need to 
as i said everyone worked perfectly
here is the finished candle ready to decorate
 honestly do try it with the stick and spray 
Brilliant stuff 
Magic in my eyes
your able to hold the candle while your heating too
 with the greased proof paper i felt i couldn't see the wax clearly melting  
this way you have no fear of that it's happening there right in front of you
  i had no problems heating the image that had the stick and spray onto my candle
no fumes or any such thing at all

i was in full control at all times doing it this way 
 didn't feel like that using the greased proof wrap that's for sure
i do like to be safe when im crafting

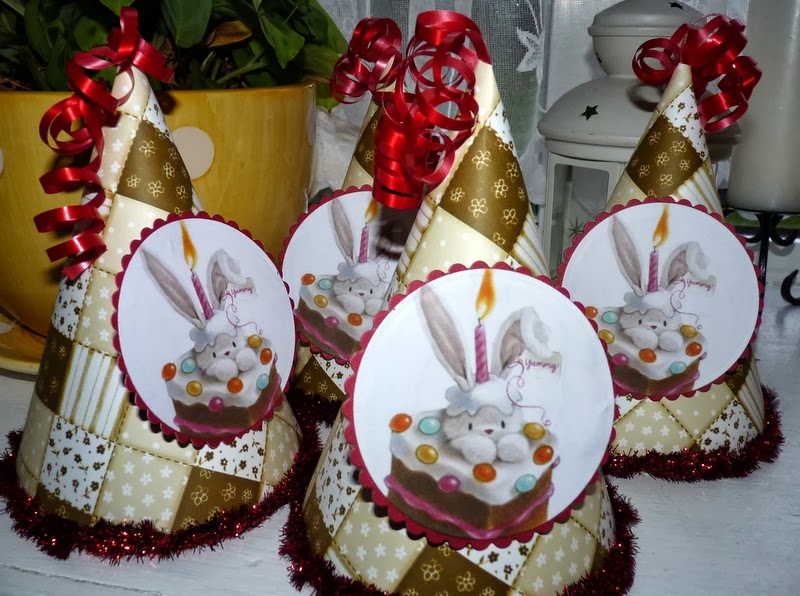
 here is one of the other candles that  i made this morning 
decorated all ready to give as a gift


PS: just added a picture of the Stick and Spay
you need
 i type in the wrong product name  earlier
so sorry
 don't want to miss lead anyone 
thank you for dropping by
 hugs linda xxx


Thursday, 28 November 2013

Nanna Said

hi there crafters 
not been too well for few days caught a nasty bug 
 feeling a lot better now i felt like crafting.

what a laugh !
 i wanted decorate some candles for Christmas so i gathered all the things i needed  it looks blooming easy when you watch others well i landed up doing a jig trying to keep my hands away from the heat gun and hold a candle at the same time needless to say
first one was OK-ish!!!!! cough cough...


 i wasn't going to be beat by a candle.
 but i could see my small stash of candles going out of the window after the first attempt
so i asked a few of my crafting buddies for some tips 
and as ever they came up trumps. 
off i trot to get sorted once more

i decided to make some keepsake ones for my grand children

 colored them in with my
 Next Generation Spectrum Noir
that was novel 
first time i have colored onto tissue paper they didn't bleed at all
  in fact they behaved very very well in deed 
i was impressed

 so here's my finished candles


 special message for Santa on the reverse 
he can't argue with this message 
im sure
created the message in craft artist and printed it out onto tissue paper
thank goodness for Stick and Stay   
it held the tissue paper firmly to paper while it went through the printer
and stayed tacky enough to allow me to place on the candles
perfect for this sort of thing

here are the SN colors used 
GB6,GB8,GB10,BG1,BG2,BG3,OR3.DG3,CR11,DR6,TB3,TB5,BP4,BP7,IG6
,IG9,EB4


i think i could get used to this candle crafting
 it's fun once you get the hang of it
 note to self ....
must stock up on more candles

thank you for dropping by 
hugs linda xxx


Tuesday, 19 November 2013

Little card using New Spectrum Noir Pens

Had a little coloring session with 
the New Spectrum Noir Pens
from 

  really enjoyed coloring this digi
from Aurora Wings
it's been a nightmare trying to get a half decent  picture 
the light is shocking at this time of year


 a  plain layout for this card 
black and gold metallic card onto a 6"x 6" centura pearl card blank
here are the colors used
TN1,TN2,FS1,FS8,HB1,CR2,CR3,CR4,CR5.CR7,EB1,EB2,
CG2,DG1,DG3,GG2,CT1,CT3,TB7,TN7 TB3,TB7,BGR3

thank you for dropping by today 
hugs linda xxx

Monday, 18 November 2013

Next Generation Spectrum Noir Pens

Hi Crafters 
well i have been Coloring with my 
New Spectrum Noir Pens

  they are truly a pleasure to work with
they really are im totally in love with them  
the newly formulate inks blend even better if that can be possible 
well i can say  Yes they do !!!
double locking lid and the new Brush nib
the soft grip is great very comfortable feel love that  
the finer nib really does get into very tight area's

so what have i been making
i decided to make my Mums Birthday card

Along Side the Fantastic Next Generation Pens 
I used  Centura Pearl card Embossing folder 3D gel and Tacky glue
from 
 Some die cut boarders and Frantage

The Spectrum Noir Pens Used 
TN1,TN2,FS1,FS8,EB1,EB2,GB1,PP1,PP2,PP5,PP6,HB1 and Blender pen

thank you so much for dropping by

hugs linda xxx


Sunday, 17 November 2013

Mo Manning in Spectrum Noir

Hi there Crafters
had a lovely relaxing weekend watching
both 
Sheena and Leann over on create and craft
it seems your all loving the new Stamps Silks 
and the Brand New 
Spectrum Noir Pens
 so thought i would make a start on some of my Christmas cards

with this fabulous Digi Image
from Mo Manning


printed the text in Serif Craft artist  added the image and printed out 
once colored i scattered some White Frantage and Crystal glitter
layered onto Mirri and Centura Pearl Card Blank
added die cut Snow lakes and dew drops

here are the SN colors used
Dog IG1,IG2,IG3,IG4,IG8,True Black ,GB1,GB5,GB9,GB10,GB11,FS3
Barrel TN3,TN4,TN8,EB8,CR11,DR3,DR7
Shadow GG1,GG2,GG3,HB1,Blender Pen

got more to colors lol 
thanks for popping by today 
hugs linda xxxx

Friday, 15 November 2013

Sheena Douglass New Coastal stamps

hi there Crafters
so it's nearly Launch time for 
the 
New Sheena Douglass
Coastal Stamps

 my card for today 


i used Distressing inks on this one 
stamped the sand dune with distress markers
then colored a strip of card with more distressing inks  
stamped the Puffin and bird in black 
then removed  the color from the puffin with clean water
matted and layered onto brown mirri and core-dination card
a little bit of ribbon and a wooden button to finish off
i think 
that full flash of color draws your eye to the puffin
thanks for dropping by 
hugs linda xxx

Wednesday, 13 November 2013

More Silks and the beautiful Sheena Douglass stamps

Hi there crafters
 more from the silks for you today 
set 6 Christmas colors with Ice

for this box of crackers i used set 6  straight from the jar onto Neenah with cut and dry foam
randomly sponged all three colors how easy is that to make backgrounds no muddy colors cut out the crackers with a tonic die then made the box with my Ultimate box board 

but this is the exciting bit

you can change the colors with the Ice
it's a very understated  color in the jar that holds pure magic
i made a very watery puddle of each of the colors from set 6 then added the ice
so you would be able to get the full spectrum  of color tones by just adding water and ice 
be careful with your colors they are very concentrated in colour a little goes a heck of along way!

made the background by dropping all 3 colors onto card then let them mingle together
once it was dry i added a tiny bit more color to each puddle dropped on the darker color and blew out with a straw to get that coral effect  the shells were stamped onto the patterned card then heat embossed with clear cut out and dipped in frantage

 i altered a paper mache box with the same colors to match the card

there is a lot going on with this little box that doesn't show in the picture
i have used modelling paste and the waste die cut branch from my card
cut out the shells that i stamped and decorated the sides and lid using 3d Gel
from Crafters Companion
 i did paint the inside with the red from set 6 just one coat straight from the jar 
no need to do any under painting 
just one coat covered the brown how great is that 
and finally another card 
using the shells Ice and distressing inks
the ice acts as a resist to the inks and with very little effort you can get some fabulous effects in no time at all
thank you for dropping by 
hugs linda x

Tuesday, 12 November 2013

Have you heard the Buzz Silk have hit the building

Hi there crafters
 i have been quite for few days
 when that happens it's because im playing with crafting goodies

THE NEW STAMP RANGE 
from 
 will be staring along side the 
Luminart Silks
 launching over on 
Create and Craft the 16th November
your in for some exciting times with the Silks

 thought i would chat about the Silks

when they arrived i thought OK paint in a pot !!!
 this couldn't have been further from the truth
 they are concentrated color glazes with mica that are water soluble so easy clean up
they don't buckle paper when applied to even a page from a book and
dry very quickly too 


i got set 6  and set 4 to play with
 
set 6 are to me Christmas colors
Cardinal red Mallard green Emperor's Gold
set 4 are Autumnal with long side a jar of the Ice 
these are swatches are straight from the pots from set 6
 to card stock see how they glimmer
they can be layered on top of one another you don't get mud 
a dream to work with they truly are 
i love them 
great for card makers scrap booker's and artist
in fact the possibilities of Silk are endless you can go direct to stamp with the silks sponge and stencil with no bleed under too
 throw silks with all the other crafting goodies from your stash                                                    the world is your oyster 

so you have seen the silks 
now for my card using 
the Coastal Stamps from Sheena using set 4
 i made the background paper with the colors from set 4 then stamped out the image with memento inks colored with my spectrum noirs and added the ice over the top to  give it some sparkle
the best bit was  after applying the ice i went back into darken some area's off the boat with my pens how great is that you can use pens over the silks the anchor was a dull silver  die cut 
so i added the 3 colors on top and heat embossed in clear  for that extra shine
 simply matted and layered onto black card  
from 
Crafters Companion with dew drops to finish
i do hope you will join me again 
thanks for dropping by
hugs linda x


Tuesday, 29 October 2013

Genie

Hi there Crafters
 had a little me time 
to make another picture for my Grand Daughters Bedroom 
she loves Pink 
i got that part right lol .....

  Genie 
is from Saturated Canary
 love this stamp
and of coarse i colored her with my 
Spectrum Noir


 i colored the main image then added the fantasy turrets for a bit of a magical feel
 then  made a paper template of morE turrets as i wanted to add  more to the picture mount
theses were also colored with pens so they matched the image and give some depth and a little more interest to the picture

 here are the Spectrum Noir colors used 
TN1,TN2,CR3 HB1,PP1,PP2,PP5,PP6,GB10,
BT1,BT2,BT3,BT4,BT6,GB1,GB5 and Blender Pen

with lots of crystal glitter and  dew drops
tacky glue and 3Dgel 
from 
 thanks for dropping by 
hugs linda x

Friday, 18 October 2013

The Bebunni party begins

the Party will be in full swing
over on Create and Craft
Be Bunnie Time
im sharing a few Party things i have made using the 
Bebunni CD

 party hat 
 using backing paper and the Decoupage layer 1
 i downloaded the template of the hat from the Internet
Google party hat template 
there are plenty to choose from
 i printed the backing paper then printed the template on the back and cut out

plastic party plates 
i fussy cut the same decoupage image then stuck to plate with tacky glue
 to make sure it was wipe-able i covered the whole base with clear sticky back plastic

Party bags
these are just read to cut how fantastic is that
i didn't cut the handle i thought it would be a great idea to write the child's name in that space
 i did laminate some matching place mats but forgot to take a picture
 anyway 
with this CD you are able to have a fully co-ordinated party setting
great for any party
i hope you  will tune in to watch the launch
thank you for dropping by today
hugs linda xxx